
Did you know that 75% of Americans may be living with chronic dehydration? Don’t let your health suffer because you can’t stand the taste of tap water or don’t trust its quality. Installing a water filter in your refrigerator is an easy way to provide yourself and your family fresh, clean drinking water on-demand. And, you don’t need professional help to do it.
Keep reading for an easy to understand step-by-step guide to installing a water filter!
Before Installing a Water Filter
First, you’ll need to determine which type of filter your refrigerator has and where it is located before you buy a replacement and make the change. There are three primary types of fridge water filters:
- Push-In: This filter type can be found in a few different places. Look for a compartment in the front bottom of the refrigerator, behind the grill, or inside the upper right corner. You’ll also notice a push-button that releases the current filter.
- Twist-In/Quarter-Turn: Both of these names refer to the same filter type. Typically installed inside the refrigerator’s top right-hand corner, this filter twists or screws in and out of place.
- The In-Line: Also known as a water line filter, this filter type attaches to the incoming water line on the backside of your refrigerator. You’ll have to pull the fridge out to access it.
You should check your old filter for a serial number and brand, which will help you locate the appropriate replacement. If there are no visible markings on the filter, you might need to contact an expert in fridge filters for help with identification.
How to Change a Push-In Filter
- Eject your old filter by pushing down on the button next to it. Then, remove the filter cap but don’t discard it. You’ll use it again!
- Put your old filter cap on the new filter, making sure it’s properly aligned.
- Slide the new filter into place. You will know that it’s properly positioned when the eject button pops back up.
The best part of using a push-in filter is that you won’t need any additional tools to complete this task.
How to Change a Twist-In/Quarter Turn Filter
- Locate your refrigerator’s twist release, and give it one quarter turn counterclockwise. If it doesn’t budge, you might need to gently loosen it with a wrench.
- Slide the old filter out, and set the filter cap aside. You’ll be reusing this part!
- Put the old cap on your new filter, and double-check for proper alignment.
- Slide your new filter in, and turn it gently clockwise until it you hear it click back into place.
The only tool you should require for changing this filter style is an adjustable wrench.
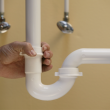
How to Change an In-Line Filter
- Turn off your refrigerator’s cold-water supply.
- Locate an easily accessible section of tube between the water shut-off valve and your refrigerator. Using tubing cutters for plastic or copper, carefully slice through the tube. Try to cut straight across instead of at an angle, to help avoid leaks. Then, smooth the edges of your cut with steel wool.
- Remove the cap on your new filter and insert the tubing. Then, lock it into place by pressing down firmly on the end cap.
- Turn the refrigerator’s water supply back on.
- Hold your new filter over a bucket and run water through it until clear.
For this type of replacement, you’ll need plastic or copper pipe cutters, steel wool or a file, and a bucket. But, if that sounds a bit to challenging, it might be time to call in the pros.
Ready, Set, Swap!
Now that you know how easy installing a water filter can be, you’re probably excited to swap yours out. That’s great! Reading this article could be the first step toward a happier, healthier, and fully hydrated family.
If you enjoyed this blog post, don’t miss out on the rest of our content. Our homepage features hot tips and advice on beauty, lifestyle, home, fashion, technology, and more!


 in Marion NC")