The material that has replaced the traditional walls and finishing of plaster, which is an extremely durable and resistant material, is the drywall finishing. Compared to the plaster in durability and life, the drywall is very weak and is prone to develop damages over time, either intentional or gradually with time. Well if it is not that strong and durable then why has it taken over and become even more expensive and wanted in the market?
The main reason why drywall surpasses the traditional plaster is that it is much cheaper, lighter in weight, and a lot easier to install and repair. You can easily find numerous drywall repair services in GAor any other state, they’re all the some more or less. Where the plaster takes days to dry and hard work of mixing, also quite a decent amount of labor force required to complete it, all the time consuming and complex tasks are completed and done by the companies and are packed ready to install. Instead of waiting days for the finish of your construction, you can have the drywall installed before you even know it with more beauty and safety at the same time, drywalls are resistant to heat and also might act as an insulating body.
Weak Points Of A Drywall
If you’re planning on installing drywall or have it installed already, you need to make up your mind about the repairs that are going to be due sooner or later. Unlike many other household problems, drywall cannot be completely protected against harm as it is very delicate in that sense. It is at times the dents left by the door handle, or corner of the walls around the edge withering away with a grazing vacuum cleaner, or even your kid poking a sharp object onto it. The drywall can prove to be vulnerable to many hazards like this. Apart from this, drywalls are also very sensitive to temperature changes, they tend to expand with heat in summer and contract to the cool winds of winter which makes them develop cracks with time.
As you probably know by now that almost all of the damages to the drywall in the shape of cracks and dents, is not something that happened due to poor neglect but the sheer occurrence of nature. Usually when you have enough holes and cracks on your walls to make it look bad, then only do people reach out to either commercial or residential drywall repair contractors to return the charm of your house. As much as it is easy to install, it is even easier to repair. Leaving out extreme cases where it needs replacement or more technical work, outsourcing to professional is always recommended but most of the drywall repairs can be solved and performed by you with just a handful of tools and equipment.
Drywall Repair And Maintenance
Once you have learned the art of fixing the drywall yourself, your walls will now be looking ever fresh and clean taking a big load of subconscious stress off of your mind. To make drywall repairs easiest and accessible, a step by step guide to repairing drywall damage has been compiled as follows:
- First of all, you need to locate the damaged area you want to repair, then find a used or new piece of gypsum board having thickness exactly the same as that of the drywall. Cut it out into a rectangle that is just large enough to cover the complete hole. Once you have that done, place the rectangle over the hole and draw out its edges cleanly on the drywall after which you will now remove the rectangle.
- With the outline in place, precisely and accurately cut out the rectangle drawn onto the wall with basic drywall repair tools you can get at the supermarket. After cutting out, smoothen the edges of the wall. Take a wooden slab that is just a little over the length of the triangle and glue it to the backside such that its center falls on the hole while its ends stick to the drywall. This provides a firm backing for your fresh cut out rectangle to be glued against and held tight.
- Now place the smooth rectangle cut out from the scrap drywall into the hole carved into the existing drywall. Screw it up with two screws at the back against the wooden slab installed earlier to hold it together in place and to avoid movement. Once the rectangle is securely in its place, apply strips of drywall tape along the edges of the new patch and even run your fingers across it to smooth it out. Placing a cutout of window screening on to the new patch can be an alternative for the drywall tape.
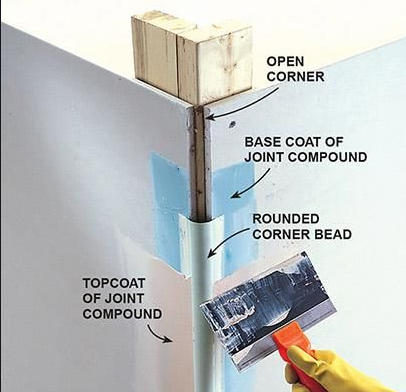
- Now using a 6 inches drywall knife, apply a thin coat of joint compound in such a way that it covers the entire patch evenly and smoothly. Your main objective over here is to be covering the entire patch that was replaced and also the 4 seams between the patch and the wall. Leave it out for around twelve hours or overnight and it should dry out good enough to apply another coat. Now using a twelve inches drywall knife, apply the second coat of joint compound as the residential and commercial drywall repair services recommend. The second coat is applied with an extra bit of delicacy and care, to smoothen and buff it out completely.
- By now almost the entire process of the drywall repair by yourself is done except with the presentation. For the repaired drywall patch to be dry enough to sustain a coat of paint without changing shape or crumbling off, it needs to be left out for twelve hours or overnight again. Sanding and gritting it then is going to give you a smooth surface that is even to that of the previous wall. You can now choose the paint of your liking to match the wall and your repair is done completely.